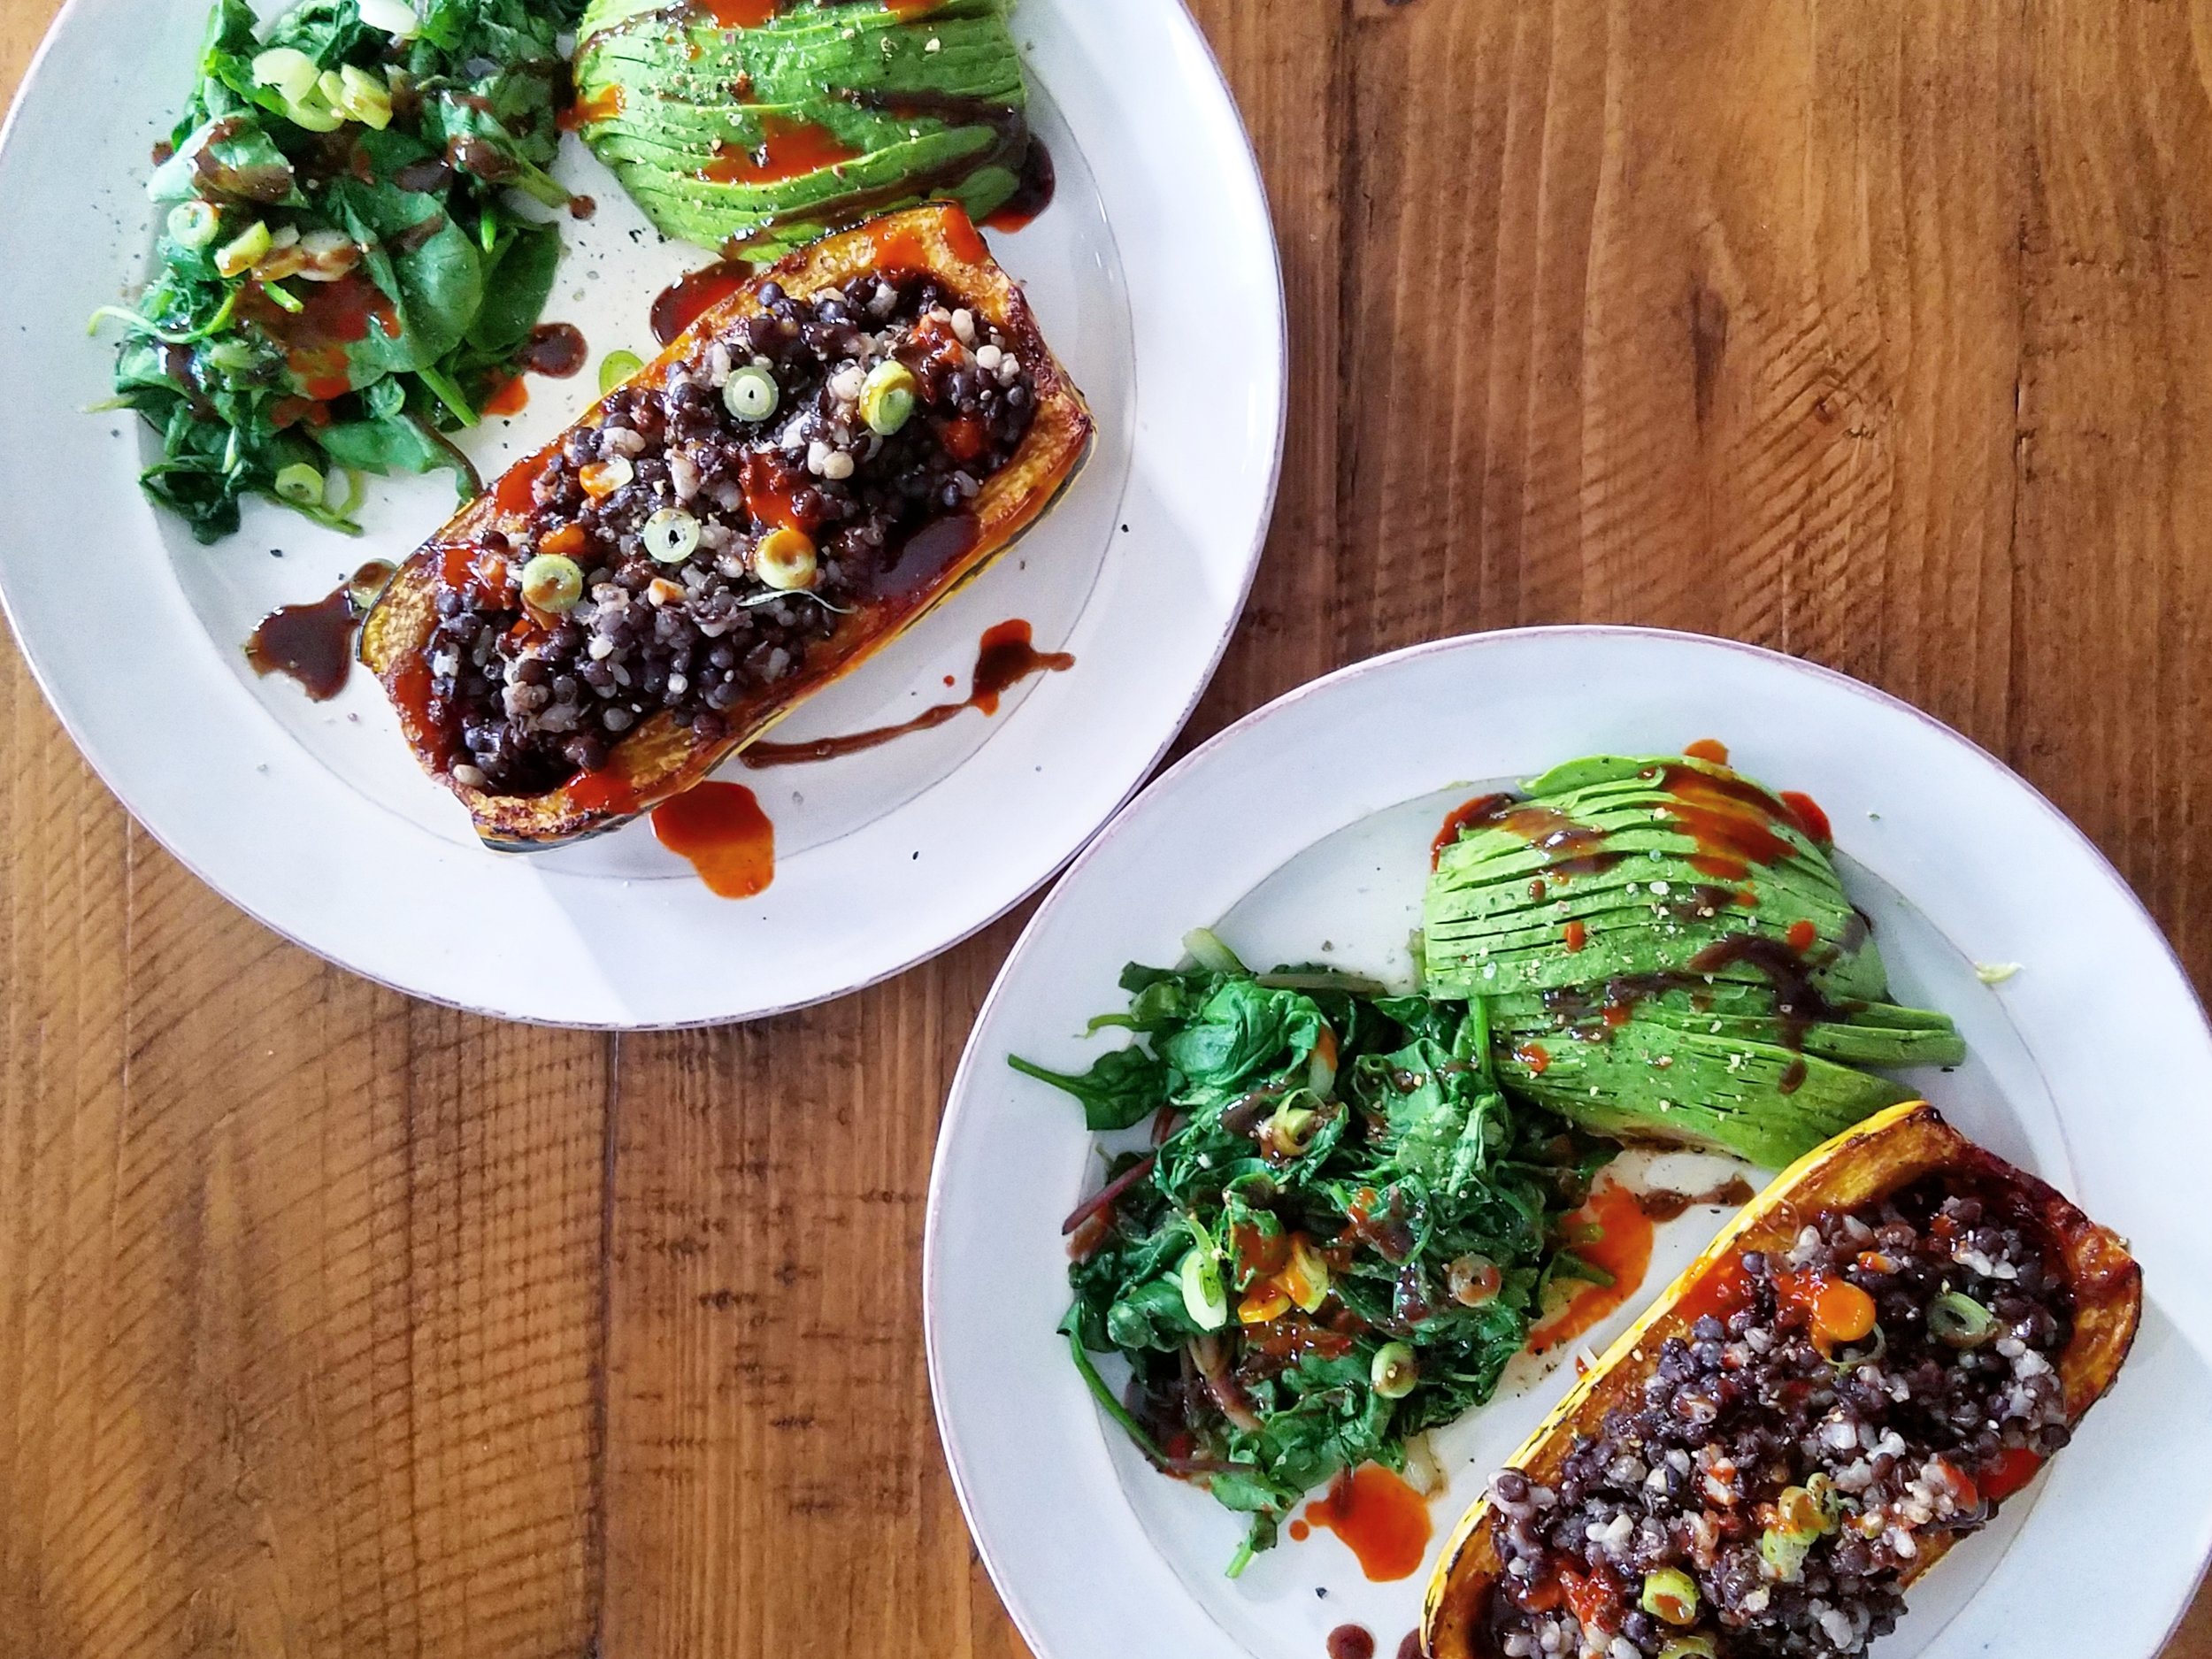
Veggie & Hummus Wedges

tortilla wedgesFood for Life brown rice tortillas (wheat and gluten-free!) are great for wraps, but are even better sliced into wedges and lightly toasted in the oven into a chewy-and-crunchy (around the edges) "chip." Then you can go to town adding whatever you want on top, and the tortilla provides a light base that's supportive enough to not sog or crack beneath your topping of choice. This is yet another example of a "recipe" that's really just one example of infinite possibilities this can serve as inspiration for - and a pretty tasty (and very healthy) one at that!tortilla wedges Without formatting this as a formal recipe, here's a basic description what I used and did - take it as a springboard to create your own! I:

  • Sliced 3 tortillas (this makes for a light meal for 2, or a good snack or appetizer) into 6 wedges each, placed them in an even layer on a baking sheet and lightly toasted them in a 375 degree oven for about 10 minutes (just keep a close eye on them - they're done when ever so lightly browned around the edges)
  • Diced equal parts tomato and cucumber (de-seeding both first), and tossed them with a pinch of salt, black pepper to taste, and a shake of garlic powder since I for once didn't have fresh garlic on hand
  • Finely chopped a few handfuls of Trader Joe's Organic Power to the Greens (a mix of baby kale/spinach/chard)
  • Spread a dollop of kalamata olive hummus on each tortilla wedge and topped with a scoop of tomato/cuke or greens, and drizzled some balsamic vinegar on top of each wedge
    • I can't get enough of Napa Valley Grand Reserve Cherry Wood Aged - it's thicker, almost like a reduction, and really just perfect
    • basiltops habanero veganpesto vegan

      I also added some pesto, though I didn't capture that with my camera - check out Basiltop's varieties - amazing!! I discovered them at a Santa Monica farmers market, and we've been devouring the vegan habanero pesto

Creamy Tomato Basil Sauce with Spinach Linguini & Garlicy Spinach

To start, a note on nuts: while nuts aren't low in calories, they have loads of health benefits. Especially cashews (which do happen to be lower in fat than most other nuts) - they are full of heart-healthy monounsaturated fatty acids, including oleic acids, and essential nutrients like copper, manganese, tryptophan, magnesium and phosphorus. It's a fallacy that foods, like nuts, that are high in fat make you fat. Moderate consumption of nuts is actually great for your body in many ways.

I however am of the "keep the nuts out of my baked goods" camp. I enjoy eating a small handful of nuts once in a while, and I love nut butters. But aside from a making cashew-based vegan strawberry rhubarb cheesecake and homemade nut butters, I haven't cooked extensively with nuts in non-traditional ways. Until last week, I hadn't made any attempts at transforming them into a palatable replacement for heavy cream and other similar dairy ingredients in recipes. I think that's probably because even when I ate loads of dairy, I never really craved heavy foods laden with it - like rich, creamy sauces - so it would be relatively unusual that the mood would strike now.

vegan tomato basil cream sauce

vegan tomato basil cream sauce

But, I was blown away by how easily and deliciously cashews could be made into a vegan cheesecake and have tasted other wonderful things of that nature in restaurants and bakeries - so that combined with a blame on Pinterest (really... I could waste so much time looking at food photos on there, among other things!), I decided I wanted to try and make a savory tomato cream sauce from cashews.I basically followed Oh She Glows' recipe for this vegan tomato basil cream sauce (and her's was adapted from Vegan Yum Yum), except I added a bit more of each ingredient, as well as a few shakes of red pepper flakes for some heat. I also used a combination of tomatoes on the vine and sugar plum grape tomatoes (ripe, flavorful tomatoes are really key). The sauce made enough to generously cover a pound of pasta.Let me tell you - this is GOOD.For the pasta, I cooked organic spinach linguini to al dente doneness - though any pasta (wheat or gluten-free) would work great with this sauce. And, to get some more veggies in the mix, I sauteed a bag of baby spinach (must buy organic when it comes to spinach) in about 2 tsp of olive oil, two cloves of chopped garlic and lots of black pepper, and served the pasta over that.It's an easy dish that comes together quite quickly, and I was surprised at how good it is. If you don't have a nut allergy and want the sweet-savoriness of a tomato cream sauce without the dairy, this is a fabulous way to go!

Quick One-Pot Chili & Cornbread

This is officially going to be a soup and stew-filled winter. Add to that a sub-category of chili.I hadn't made chili in ages, but the mood struck last week - perhaps inspired by the onset of some chilly weather - so I decided to try out an idea I've been mulling over for a while: a one-pot chili and cornbread dish.Now, I will preface by saying that I fully understand that chili, like stews, is best when it can cook (er, stew?) for a long time. I opted for the quick(er)-fix version last week though in the essence of time. It hit the spot, but I am sure a longer cooking time would allow for a fuller depth of flavor to develop. Just something to keep in mind and/or manage expectations when it comes to a quicker-style chili like this!That being said, it's nice to you know you can throw together a tasty - and SUPER healthy - chili relatively fast in one evening, and if you make it in a pan that is good both on the stove-top and in the oven (e.g., cast iron), it goes from one to the other seamlessly. The cornbread topping is like a savory literal and figurative "icing on the cake"!Consider this recipe more of an approximation. Play around with the spices to your liking, and if you have other vegetables lying around, add them as well/instead - and just adjust the liquid content and seasoning as needed. Here's what I did:Recipe: Quick One-Pot Chili & CornbreadWhat You Need (translation: what I used) for the Chili

  • 1 sweet onion
  • 2 cloves of garlic
  • 1 medium sweet potato
  • 1 small zucchini
  • 1 cup (approx) baby portobello mushrooms
  • 1 yellow pepper
  • 1 can (14.5 oz) diced tomatoes (preferably unsalted)
  • 1 can (14 oz) tomato sauce (preferably unsalted)
  • water and/or low-sodium vegetable stock, as needed
  • cumin, chili powder, cayenne pepper, salt & pepper - all to taste
  • 2 cans of beans (I used the Simple Truth organic tri-bean blend sold at Fry's - their organic offerings have been getting much better lately!)

What You Need for the Cornbread

  • 1 c cornmeal
  • 1 tsp baking powder (note: if you don't live at a high elevation, you might want to up this to 1.5 tsp)
  • big pinch of salt
  • big pinch or turbinado sugar
  • 3/4 c unsweetened coconut milk
  • 1/8 c unsweetened applesauce
  • 1/8 c canola oil

What You Do

  • Finely dice all veggies and very finely chop the garlic.
  • Heat a large oven-proof pan (e.g., cast iron) on the stove over medium heat and add a glug or two of olive oil (told you this recipe includes very precise measurements...)
  • Add all of the vegetables (not the canned tomatoes) to the pan and sautee for at least 15 minutes
  • Once the veggies begin to soften (the potatoes will take the longest), add the cans of tomato and seasoning. Try starting with 2-3 tsp cumin, 1 tbsp chili powder, a big pinch of salt, a lot of pepper, and a shake or two of cayenne depending on how heat-tolerant you are!
  • Stir and add water/stock if you want to thin the consistency at all
  • Bring it to a gentle simmer, and cover - cook for about 20 more minutes (or until potatoes are softening), stirring and tasting periodically and adjusting the seasoning if needed
  • Preheat the oven to 400
  • In a small bowl, whisk the cornmeal, baking powder, salt and sugar together - then stir in the coconut milk, applesauce and oil until all are thoroughly combined
  • Turn the heat off under the chili, and use a spatula to spread/dollop the cornbread mixture relatively evenly over the top of the chili - the chili doesn't need to be entirely covered, but try and keep the thickness of the batter as consistent as possible
  • Bake for about 30 minutes, or until the cornbread is golden brown around the edges and starting to crack; it'll be firm to the touch
  • Remove from the oven and let it sit for 5-10 minutes before serving... then enjoy!

DIY Whole Grain Dijon Mustard

And now for DIY recipe numero uno.I lurve mustard. All kinds, and the spicier the better. The kind of spice/heat from mustard seeds is one of my favorites - similar to wasabi - I love that sinus-clearing, head rush of heat versus a mouth-scalding burn (which I used to not be able to tolerate at all, but have actually come to love flavorful hot peppers that do that too!). Grocery store chains and local markets usually have a great variety of mustards to buy, but when browsing the spice aisle of the new-ish Natural Grocers store here in Prescott, spotting yellow and brown mustard seeds at a crazy low price made a lightbulb go off over my head... make mustard from scratch!So simple, so worth it. This is a super basic recipe. So much so that I am not sure if this even meets true "recipe" qualifications - it's that minimalistic. I played around with ingredient ratios, and this seemed to balance out the best. The mustard is spiciest right after the preparation process is complete, and I know the spice factor can mellow out over time... but just wait and see if you can make the mustard last long enough to get to that point (we haven't). A good, grainy dijon mustard is such a great, multi-purpose kitchen staple - mix it into vinaigrettes, use it as a marinade, spread it on sandwiches, dip veggies and pretzels into it (highly recommend Trader Joe's pumpernickle variety) - you'll use it up in no time. Make some and keep it for yourself, and make extra to give as a gift for a mustard-loving pal.Homemade pretty much always wins, and certainly when it comes to a whole grain dijon mustard, homemade / DIY takes the cake!Recipe: DIY Whole Grain Dijon MustardWhat You Need:

  • 1/2 c dry white wine
  • 1/2 c good white wine vinegar
  • 1/4 c brown mustard seeds
  • 1/4 c yellow mustard seeds
  • a few grinds of black pepper
  • 1/2-1 tsp salt

What You Do:

  • Mix all ingredients in a small jar or bowl
  • Cover container with plastic wrap to seal
  • Let covered container sit on your counter (not in direct sunlight) for 2 days - you'll notice that the seeds will absorb the liquid
  • Pour mixture into a small food processor, and grind/blend to desired texture - leaving some grainy-ness is best!
  • Store in an airtight container in the refrigerator (I think it should keep for at least a few weeks)


Let Your Fruit Flag* Fly!

Speaking of World Vegetarian Day / Vegetarian Awareness Month - our afternoon yesterday was veggie-filled. We were fortunate enough to get an up close and personal tour of a local friend and Thai-restaurant-owner's home garden, which was pretty spectacular and gave us major plant envy. He was even so incredibly kind as to send us away with a very generous sample of some of his 14+ tomato varieties (many heirloom), as well as several Thai and other hot peppers, some Italian plums, concord grapes, an heirloom spinach, and more:

(*hence the title of this post... the way all of the produce looks in this photo from how we laid it out made me think of a flag!)

The yellow tomatoes in the center of the photo are particularly interesting - their skin is soft and a little fuzzy, like a peach - we'd never seen that before. The spinach was also really unique - we took a bite and could only describe it as "super spinach" - it's a thicker, denser spinach than the typical variety, with more flavor and substance. It was also my first time tasting a fresh concord grape... OH my. Absolutely and immediately one of my favorite fruits. Now, to try and grow some ourselves...And what's in this photo just touches on what his garden grows - there's also chard, apricots, blackberries, tons of herbs (Thai basil!), and lots more. It was very inspiring! We are in the process of planning how to improve and expand what we're growing at home.So naturally we had to put some of these amazing veggies to use for dinner last night. I threw together a variation on this Simple Summer Heirloom Tomato Fusilli.I used a few different tomatoes from the above photo, as well as some yellow grape tomatoes we already had. Heated a little olive oil and some leftover dry white wine (Berger - one of our favorite Gruners) in a pan, and tossed in a few tablespoons of chopped shallot and garlic. Oh but not just any garlic - elephant garlic!:Look at the size of it! I photographed it in my hand for a point of reference. I've never cooked with it before...  needless to say 3/4 of a clove goes a long way (and this is coming from a garlic lover). I haven't yet researched how it differs from regular garlic other than in size, but if I had to guess I'd say it might be a little milder.Once the garlic and shallots softened and became nice and aromatic, and the alcohol from the wine burned off, I added some lemon zest, lemon juice, a full bag of baby spinach, and the tomatoes. I also added some chopped jalapeno (from our garden) and some thinly sliced Thai chili pepper for a kick of heat, as well as a sprinkling of sea salt and a bunch of ground pepper. And a few handfuls of basil from our garden.For pasta, I used remnants from two boxes: a bit of our favorite long fusilli and and also a little gemelli. I tossed the pasta with the "sauce" once it was al dente, and then I added some fresh arugula to the bowls we ate out of for some crunch and additional veggie bulk. I love recipes like this, because it's barely a recipe at all - you just use what ingredients you have and go off of your own taste preferences, and throw something together. It was a great light dinner.

5-Bean Brown Rice & Pumpkin Seeds with Tamari

As I wrote in my last post, preparing some of your own food when traveling and staying in hotels is good for both your health and your wallet if you have the means to do so (aka have use of some basic kitchen appliances wherever you are staying). Plus, when in a foreign country, it gives you more excuses to browse the sometimes curious and sometimes wonderful and new-to-you items found on their store shelves (...orrr maybe that's just me?). So, first came smashed avocado toast, and now here's another simple yet satisfying concoction: mixed beans with brown rice, pumpkin seeds and soy. It consists of literally just 4 readily-available ingredients, is 100% vegan and also gluten-free.Interestingly, on a gluten-related note, New Zealand seems to be very gluten-conscious and it's extremely common for restaurant menus to indicate GF (gluten-free) options. From the little bit I've heard, it seems that gluten allergies/intolerance is quite common here. I'm curious to do some more digging into that and why it is so.But anyway - back to the recipe! I boiled some medium grain brown rice (read more about the benefits of brown rice vs rice here), cooled it a bit in the fridge, and then mixed in a 14 oz can of a five-bean mixture (rinsed & drained), some pumpkin seeds and some low-sodium tamari. Back into the fridge it went in a ziplock baggie, and we ate it as part of dinner one night and I had it for breakfast as well. Yes - a grain/bean/seed/veggie (though there were obviously no vegetables in this recipe) combo makes for a really great and nutritionally optimal way to start the day!I didn't have any measuring utensils to use, so I just eyeballed everything and taste-tested to get the right amount of tamari. You can definitely use a different rice/grain and any bean(s) you prefer, and use soy instead of tamari - just know that soy sauce is not gluten-free.This recipe was inspired by a friend of ours back home who has been a vegan for years and serves as a go-to source of nutrition-related info for people in her life. One challenge people on a plant-based diet sometimes face is preparing some interesting, tasty and nutritious food at home that can be taken on the go and doesn't need to be refrigerated all day to prevent spoiling. She pointed out that mixing a few ingredients, like what's in this recipe, can be preserved in the fridge for a longer time and also withstand a day without refrigeration because the tamari and its sodium content acts as a preservative of sorts. So it's a great meal or snack to have with you when you're traveling/ out and about, or - if you make it when at home - keep it in a container in your refrigerator separate from veggies, and then chop and add vegetables in as you want to eat it to help preserve freshness.Final thought - did you know that pumpkin seeds have LOTS of healthy benefits? They are the most alkaline-forming seed, are high in good quality protein, are loaded with important vitamins and minerals, can be an anti-inflammatory agent, and much much more. High in fat, yes, but good-for-you fat.  

Smashed Avocado Toast

We've been in New Zealand now for about two weeks, and it has been a wonderful adventure - with more still to come! It is a strikingly beautiful country along the coast and out in the countryside and I'm really excited to see more of that.We've had some really amazing meals, in the Auckland area and throughout our south island travels (more on all of that to come). But - when traveling for an extended period of time and being mainly at the mercy of dining out, the cost can start to add up - and NZ isn't cheap!Luckily, each hotel room we've stayed in has been equipped with a sink, basic cookware/dishes/utensils, 2-burner stove top, small fridge, toaster, electric kettle (one of my favorite appliances) and microwave/convection oven. So to be able to go to a local grocery store - which I happen to love doing in foreign countries anyway - and buy a few things to let us eat in for a few meals and snacks is a great cost-saving and healthy option.Exhibit A: Simple Smashed Avocado Toast (with some Mahala Red apple slices alongside)It's as easy as can be to make this, and is great morning, noon or night. I need to also mention that New Zealand avocados are particularly delicious!!Recipe: Simple Smashed Avocado ToastEnough for a full meal for 2What You Need

  • 2 ripe avocados, pitted and scooped into a bowl
  • 1-2 scallion stalks, sliced thinly
  • pinch of salt and ground pepper to taste
  • 2-3 small vine tomatoes (or equivalent amount of a different tomato), sliced thinly
  • Good bread of choice

What You Do

  • Mash up the avocado with a fork to a still-chunky consistency
  • Add the scallions, salt and pepper to avocado and mix/mash a bit more with the fork to combine
  • Toast your bread - we used a fresh baguette this time
  • Top the slices of bread with a scoop or two of the avocado mash, lay a couple of tomato slices on top of the avocado (or place the tomatoes on the toast first - whichever you prefer) and eat up! You can also sprinkle some sliced scallion on top of your compiled toast, if you like. Note in the photo above, we forgot to put the tomato... oops... so I can testify that it's delicious without the tomato, but I do prefer it with.

Note: You can definitely spruce this recipe up with additional seasonings and veggies, but the idea here is to keep it basic and simple for easy and quick cooking a la hotel room. Though I can guarantee it'll be just as tasty as is in the comfort of home as well :)See my next post for more on cooking while traveling!

Blanco Taco & Tequila

If you're traveling through the Phoenix Airport, find yourself in Terminal 2 and are hungry - check out Blanco Tacos & Tequila, which opened about 8 weeks ago in the Gate A wing. There's a counter for faster to-go ordering, or a sit-in restaurant if you have more time to kill - and as far as airport dining goes, we were extremely impressed with Blanco. The minimalist, modern decor made for a nice atmosphere (again, especially for an airport!), the beer (love Pacifico on tap!) and food selection were great and the servers were fantastic.We had a bit of time before our flight, so we sat at a proper table in the restaurant. Too often when explaining to a server that we want to order something meat and dairy-free, they either provide recommendations that still include animal-based items, or they and/or the kitchen don't pay attention to our request and we still find butter or cheese* on our plate. Not this time though - everyone working at Blanco that we encountered was extremely friendly and helpful - exceptionally so, really - in us finding some great things to eat. Unfortunately Blanco's guacamole has sour cream in it (which I realize isn't terribly uncommon in restaurants, but I still don't understand it - avocados are so creamy as is, who needs the sour cream added?! I assume it has to do with either preservation or cost, but even so..), so we were steered away from that and toward their REALLY good freshly made chips and some spicy salsa:I ordered the mushroom tacos, which are dairy-free as is, and our waitress suggested a veggie burrito to Peter that the kitchen often makes for customers wishing to eat something vegetarian and substantial. As burritos typically come in a flour tortilla though, our waitress and the kitchen staff went out of their way enough to find out the ingredients of the flour tortillas - which happened to include dairy - and let us know before our meals came, so that we could both opt for the soft corn tacos instead. My mushroom tacos with shredded cabbage and beans were delicious, as was Peter's deconstructed veggie burrito (corn shells were wrapped in the paper on the side). Mushrooms, squash, peppers and more, and seasoned black beans, abound on both plates:Contrary to what I've found many people to believe, Mexican cuisine is actually great for vegetarian and vegan eating. Not everything has to be smothered in cheese or gobs of sour cream (something I used to be guilty of doing!) - and particularly when good, fresh ingredients are used, you can better appreciate the vegetables, beans, spices, etc. when you don't have to dig them out from under a mountain of cheese. It's hard to go wrong with a plate or taco full of good veggies, beans and some rice, though we didn't have rice at Blanco. Clean eating when traveling is particularly helpful in keeping your body - energy, immunity, GI system, and all - feeling good, and airport food can make that tricky at times. Not so with Blanco!We almost always fly US Airways, we were both really enthused to discover this great eatery in our home airport (PHX) terminal - it's great to have a clean, tasty food option that will be convenient for future travels, either when we're rushed and need to grab something to go or have the time to sit in the restaurant (and take advantage of the great service at Blanco!).A very positive airport dining experience to start off our journey to New Zealand!*(Yes I do once in a while still eat cheese - I just choose not to for health reasons 98% of the time - but when I do have it, I want it to be really worth it... more on that in upcoming NZ food posts!) 

Tomato, Green Olive & Spinach Dip

On a recent trip to Costco (with enough hunting around, there are indeed organic and clean-ingredient products to be found there!), there was a sale on Baba Foods hummus. We tasted and enjoyed many and bought three: sun-dried tomato and basil, spicy black bean, and garlic and artichoke. YUM. A nice way to switch things up with typical store-bought hummus flavors.Wanting something on the lighter side for dinner last night - and having these three tubs of hummus to go through - I figured I'd try and add some veggies to bulk the hummus up in a healthy way. What I wound up with is one of those "refrigerator/pantry recipes" - where I didn't plan ahead at all, but instead took a look at what ingredients were already in our kitchen and picked out a few that sounded like a good combination. With some fresh veggies, garlic, a touch of olive oil and a food processor, you really can't go wrong mixing together just about any combination of ingredients! And it takes all of 5 minutes. Quick, delicious andsuper healthy. Gotta love the food processor (I used a mini one) as a time saver!After preparing the tomato, olive and spinach dip, I thought it would go well with the sun-dried tomato and basil hummus. So into a bowl went the hummus, and I made a little well in the center into which I scooped the dip. We ate it by dipping in griddle pan-warmed za'atar pita (by Kermanig Bakery - another recent and great Costco find) slices.This dip works well on its own, and did exactly what I was hoping for in terms of bulking up the hummus with some quality, healthy veggies. In combination with the hummus, it's a nutritionally well-balanced dish - great for a snack, appetizer or light meal.Recipe: Tomato, Olive & Spinach DipNote: I didn't measure exact amounts when making this, but it shouldn't be a problem, as slight variations on the ratio of ingredients won't have a negative impact!What You Need

  • 1 c cherry/grape tomatoes (any color)
  • 10 medium green pimento olives
  • 1 c loosely packed spinach
  • 1/2 garlic clove
  • pinch sea salt (or any other salt will do)
  • a few grinds of fresh black pepper
  • 1/2 tbsp olive oil, divided in half
  • 5 large basil leaves (optional)
  • 1-in chunk of a fresh jalapeno (optional)

What You Do

  • Add garlic to food processor and pulse to chop
  • Add tomatoes and pulse to chop
  • Add all other ingredients (minus 1/4 tbsp olive oil) and pulse, chopping to desired consistency
  • Scoop into desired serving dish - over hummus or by itself - and drizzle the remaining olive oil over the top
  • Serve with warmed pita or whatever you want to dip in it, and enjoy!